hi,
Ive just found this great website that has loads of templates for different cards and boxes here is the link
http://www.paperscrapz.screentastic.ca/templates.html

Friday 9 December 2011
Thursday 8 December 2011
My first vintage card
i have been wanting to make a vintage card for a while, i had some lovely papers that i downloaded from various websites for free!, and i used Tim Holtz distress inks to colour the paper and added a lovely ribbon and a wooden button and here it is my first vintage card I am very proud of it too.


Children's Craft Blogs
I love to craft with my son so i thought i would share a list of some great craft blogs with things to do with your children.
http://mollymoo.ie/
http://belladia.typepad.com/crafty_crow/
http://www.makeandtakes.com/
http://www.craftjr.com/kids-craft-blogs/
http://www.plaidkidscrafts.com/
http://www.redtedart.com/2011/06/29/kids-crafts-sunflower-thank-you-cards/
http://mollymoo.ie/
http://belladia.typepad.com/crafty_crow/
http://www.makeandtakes.com/
http://www.craftjr.com/kids-craft-blogs/
http://www.plaidkidscrafts.com/
http://www.redtedart.com/2011/06/29/kids-crafts-sunflower-thank-you-cards/
Cluster Bracelet
Cluster Bracelet
This is the tutorial for my cluster bracelet it is easy and fun to make and looks really nice too and one size fits all, you will need
Headpins (how many depends of the length of bracelet and the size of the beads you are using)
Round nose pliers
Beads of your choice
Elastic
Clear nail polish (optional)
First take a piece of bracelet elastic and cut to the required length, then tie a few knots at the end so they make a larger knot so the the charms you make don't fall off.

Now using your pliers make a loop and keep coiling until you reach a few mm's from the bead(s)

Make lots of the charms and add them to the elastic

Memory wire bracelet
I made some memory wire bracelets here's how


I then started threading the beads on, do this in any design you like, pushing them down to the bottom where you made the loop, Continue to add the beads until you reach about 2 inches from the end of the wire. Next using your round nose pliers make a loop and wind it around until all the wire is coiled and the beads secured.

This is the finished bracelet and it took me just over 10 minutes to make, they also make great candle decorations, go on have a go its really easy!!

Wednesday 7 December 2011
Staring a new project tonight
I have bought some memory wire, ive seen lots of demo's on create and craft from sara from beaders companion so i have finally bought some and i'm really looking forward to having a go at it later on tonight, i will post pics and instructions later on.
Tuesday 6 December 2011
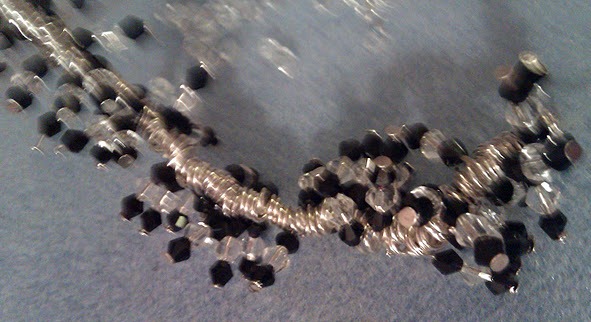
Wire wrapped necklace

The spirals were created by first creating a loop and then coulding the wire round and round until i had a spiral shape, i created loops at the end of each and added into the chain.
I followed this pattern of the spirals, coils and beads until the necklace was at the right length and then i added fastenings to the ends.
Weave bracelet

The spiral charm was made buy using wire, i started with just a small basic loop and moulded the wire around and around until i had the spiral shape. I finished off the end of the spiral by making a small loop so that it could be attached to the bracelet.
I opened the attaching loop and hooked it through the tigertail in the place i wanted the charm to hang and closed the loop back around the tiger tail.

Sunday 4 December 2011
Ordered some crafty goodies
I an very excited, just ordered some lovely crafty goodies courtesy of my lovely husband from my favourite shopping channel and website www.createandcraft.tv only trouble is i'm not allowed to open til christmas.
I ordered something ive been wanting for ages a wax stamp sealing kit i think it will add a lovely finishing touch to my handmade crafts and will make the packaging look fanttastic.

I also ordered some Tim Holtz distress inks ( i love these for ageing the paper) border peel offs and some embossing powders and heat tool.
Rayley Crafts
Hello and welcome to Rayley crafts,
Firstly here is a little story to how I came up with the name, My father Ray passed away this year on the 23rd June so i wanted to pay tribute to him, i miss him very much and this will be my first christmas without him and I have found the past few months that crafting has really helped me during this difficult time.
My name is Beverley so i took my fathers name and the end of my name and came up with the name Rayley Crafts, I hope you like it as much as I do.
I am a crafter who loves to make anything and everything and here on my blog i will be sharing all my idea's and designs for everything i make.
I first started out crafting with knitting and over the past few years it has now developed into
Knitting, Crochet, Cross stitch, Cardmaking, Jewellery making and scrapbooking.
I have recently invested in a sewing machine as well got to admit i am a bit scared of it at the moment but i will make it my resolution to learn how to sew using my sewing machine.
In the new year i will be creating my own etsy store where you can purchase the items i have made, i will also be showing the items as i make them so that you can see the designs in progress and the story and the thinking behind the design.
Thank you for visiting my blog and I hope you will visit again soon X
Subscribe to:
Posts (Atom)